Canon 5d Mark Ii How Long Continuous Video
Solusi
Notes about the movie shooting
With your camera, you can shoot photos while viewing the image on the camera's LCD monitor. This is called "Live View shooting." You can shoot movies using this function.
During the Live View image display or movie shooting, you can take still photos by pressing the shutter button completely.
Playing back the movie on a TV set connected to the camera is recommended. For details, please refer to the related information.
IMPORTANT
- If you handhold the camera and shoot while viewing the LCD monitor, there are cases where crisp images cannot be obtained due to camera shake. It is recommended to use a tripod when shooting.
- When shooting movies at the 1920x1080 size (Full HD quality), use a large-capacity card having an actual reading/writing speed of at least 8 MB/sec.
- If you use a card with a slow writing speed when shooting movies at 1920x1080, the movie might not be recorded properly. Also, if you playback movies on a card having a slow reading speed, movie might not playback properly.
- To check the card's read/write speed, refer to the card manufacturer's Web site.
NOTE
- With a 4 GB card, you can shoot a movie in [1920×1080] for about 12 min and at [640×480], about 24 min. (Based on Canon's testing standards.)
- You can shoot movies up to about 90 min. in total at 23°C/73°F or up to about 80 min. in total at 0°C/32°F (with a fully-charged LP-E6 Battery Pack).
Shooting Movies
1. Turn the camera's power switch to <ON>.
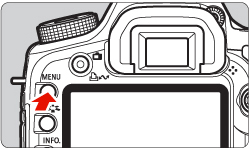
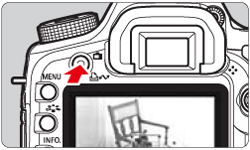
2. Make sure that the camera is ready to take shots, and then press the <MENU> button.
3. Turn the <Main Dial> to select the <  > tab.
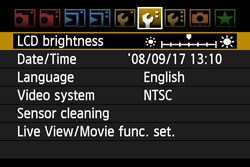
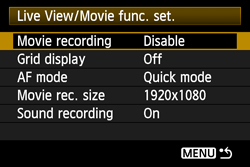
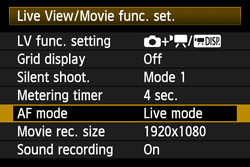
4. Turn the <Quick Control Dial> to select [Live View/Movie func. set.], and then press the <SET> button.
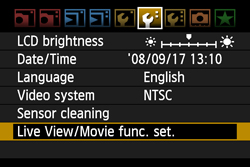
5. When the [Live View/Movie func. set.] window appears, turn the <Quick Control Dial> to select [LV func. setting], and then press the <SET> button. "LV" stands for Live View.
NOTE
In Fully-Automatic shooting mode (  ), select [Movie recording], and then press the <SET> button. After that, turn the <Quick Control Dial> to select [Enable], and then press the <SET> button.

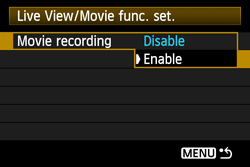
Make sure that [Movie recording - Enable] is set, and then proceed to Step 8.
REFERENCE
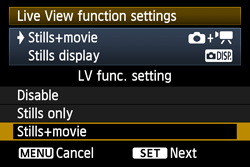
In the P/Tv/Av/M/B modes, if [LV func. Setting] is set to [Stills+movie], you can still shoot movies by pressing the <SET> button even if [Screen settings] has been set to [Stills display] or [Exposure simulation].
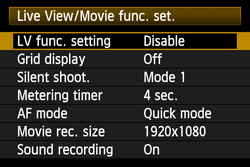
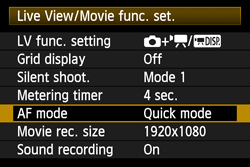
6. The [Live View function settings] window appears, so set the [LV func. Setting] type. Turn the <Quick Control Dial> to select [Still+movie], and then press the <SET> button.
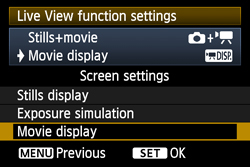
7. Next, select the [Screen settings] type.
Select [Movie display] and then press the <SET> button.
8. Make sure that [LV func. Setting  ] is set and if necessary, set [Movie rec. size] and [Sound recording].
For details on settings, please refer to the Instruction Manual that is supplied with your camera.
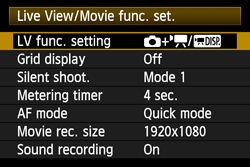
| Movie recording size | |
| 1920×1080 | Full HD (Full High-Definition) quality |
| 640×480 | 4:3 standard quality |
NOTE
Full HD 1080 means that HD (High Definition) video with 1080 vertical pixels (scan lines) is supported.
If necessary, set other functions.
9. Press the <MENU> button twice to make the menu display disappear.
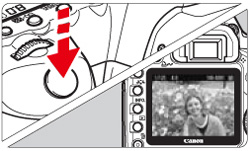
10. When you press the <  > (Live View shooting) button, the Live View image will appear on the LCD monitor.
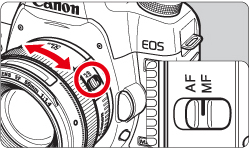
11. Set the lens focus mode switch to <AF>.

12. Press the <  > (Live View shooting) button to display the Live View image.
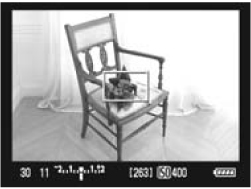
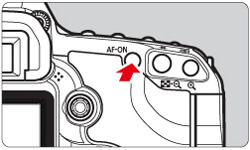
13. Select the AF point to be used for focusing, and hold down the <AF-ON> button to focus.
- Focus is achieved with the AF mode in the camera settings.
- For details on how to select the AF mode and AF point, please refer to "Changing the AF Mode Settings".

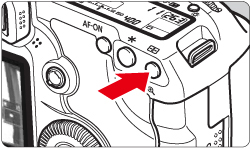
14. Check the focus and exposure, and then press the <SET> button to shoot the movie.
For shooting movies, use the <SET> button instead of the shutter button.
While the movie is being shot, the [  ] mark will be displayed on the upper right of the screen.
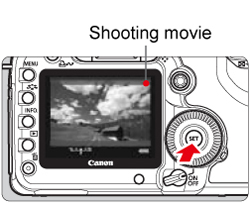
To stop shooting the movie, press the <SET> button again.
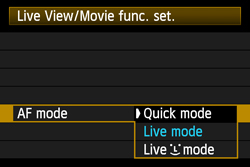
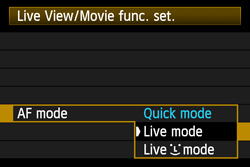
Changing the AF Mode Settings
There are three AF modes as follows. The most appropriate mode can be set depending on the shooting conditions or the subject.
| Quick mode | The dedicated AF sensor is used to focus. |
| Live mode | The image sensor is used to focus. |
Live  (face detection) mode (face detection) mode | With the same AF method as with the Live mode, the human face is detected and focused. |
If you want to achieve precise focusing, set the lens focus mode switch to <MF>, magnify the image, and then focus manually.
The dedicated AF sensor is used to focus in the same way as with viewfinder shooting. Although you can focus the desired area quickly, the Live View image will be interrupted momentarily during the AF operation.
This mode is set by default.
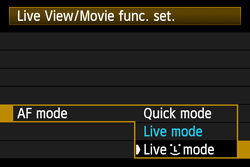
1. Once you have proceeded up to Step 8 of "Shooting Movies", turn the <Quick Control Dial> to select [AF mode].

2. Press the <SET> button to select [Quick mode], and then press the <SET> button again.
3. Make sure that [Quick mode] is set, and then press the <MENU> button twice.
4. Set the lens focus mode switch to <AF>.
5. Press the < > (Live View shooting) button to display the Live View image.
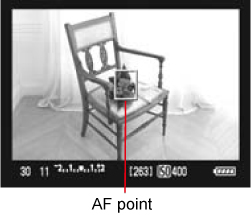
6. Select the AF point that you want to use for focusing.

7. Aim the AF point over the subject, and hold down the <AF-ON> button to focus.
- The Live View image will turn off, the reflex mirror will go back down, and AF will be executed.
- When focus is achieved, the beeper will sound. The Live View image will reappear. The AF point used for focusing will be displayed in red.

8. Check the focus and exposure, and then press the <SET> button to shoot the movie.
The image sensor is used to focus. Although AF is possible with the Live View image displayed, the AF operation will take longer than with Quick mode. Also, achieving focus may be more difficult than with Quick mode.
1. Once you have proceeded up to Step 8 of "Shooting Movies", turn the <Quick Control Dial> to select [AF mode].
2. Press the <SET> button to select [Live mode], and then press the <SET> button again.
3. Make sure that [Live mode] is set, and then press the <MENU> button twice.
4. Set the lens focus mode switch to <AF>.

5. Press the <  > (Live View shooting) button to display the Live View image.
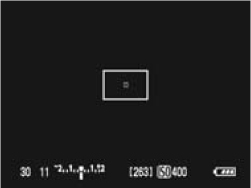
The following AF point appears.
You can use <  > to move the AF point to where you want to focus (it cannot go to the edges of the picture). If you press < > straight down, the AF point will return to the center.
6. Aim the AF point over the subject, and hold down the <AF-ON> button to focus.
- When focus is achieved, the AF point will turn green and the beeper will sound.
- If focus is not achieved, the AF point will turn red.

7. Check the focus and exposure, and then press the <SET> to shoot the movie.
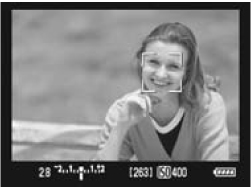
When [Live  (Face Detection) mode] is set
With the same AF method as with the Live mode, the human face is detected and focused. Have the subject face the camera.
1. Once you have proceeded up to Step 8 of "Shooting Movies", turn the <Quick Control Dial> to select [AF mode].
2. Press the <SET> button to select [Live mode], and then press the <SET> button again.
3. Make sure that [Live mode] is set, and then press the <MENU> button twice.
4. Set the lens focus mode switch to <AF>.

5. Press the < > (Live View shooting) button to display the Live View image.
The following AF point appears.
When a face is detected, the [  ] frame will appear over the face to be focused.
If multiple faces are detected, [  ] will be displayed. In this case, use the < > to move the [ ] frame over the target face.
6. Aim the AF point over the subject, and then press the <AF-ON> button to focus.
- When focus is achieved, the AF point will turn green and the beeper will sound.
- If focus is not achieved, the AF point will turn red.
- If a face cannot be detected, the AF point will be fixed to the center for focusing.
7. Check the focus and exposure, and then press the <SET> button to shoot the movie.
CAUTION
Notes when shooting in [Live Mode] (Face Detection)
- If the focus is way off, face detection will not be possible. If the lens enables manual focusing even while the lens focus switch is set to <AF>, turn the focusing ring to attain rough focus. The face will then be detected and [ ] will be displayed.
- An object other than a human face might be detected as a face.
Face detection will not work if the face is very small or large in the picture, too bright or too dark, titled horizontally or diagonally, or partially hidden.
Live Mode and Live  (Face Detection) Mode Notes:
IMPORTANT
NOTE
Shooting conditions which can make focusing difficult:
- Low-contrast subjects such as the blue sky and solid-color surfaces.
- Subjects in low light.
- Stripes and other patterns where there is contrast only in the horizontal direction.
- Under a light source whose brightness, color, or pattern keeps changing.
- Night scenes or points of light.
- Under fluorescent lighting or when the image flickers.
- Extremely small subjects.
- Subjects at the edge of the picture.
- Subjects strongly reflecting light.
- The AF point covers both a near and faraway subject (such as an animal in a cage).
- Subjects which keep moving within the AF point and cannot keep still due to camera shake or subject blur.
- A subject approaching or moving away from the camera.
- Autofocusing while the subject is way out of focus.
- Soft focus effect is applied with a soft focus lens.
- A special effects filter is used.
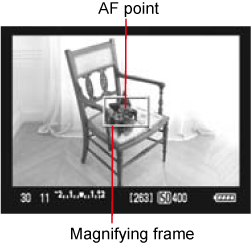
Shooting by Focusing Manually
When focusing manually, magnify the image and turn the lens focusing ring.
1. Once you have proceeded up to Step 10 of "Shooting Movies", set the lens focus mode switch to <MF>.
Turn the lens focusing ring to focus roughly.
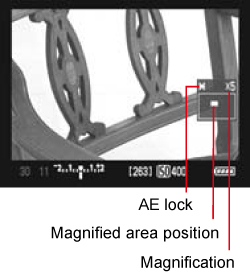
2. Move the magnifying frame to the position where you want to focus.
Use the <  > (Multi-controller) to move the magnifying frame.
If you press the < > (Multi-controller) straight down, the AF point will return to the center.

3. Magnify the image.
Press the <  > (Magnifying) button to magnify the area within the frame.
Each time you press the < > button, the display format will change as follows:
Normal view -> Approx. 5x -> Approx. 10x -> Normal view
4. While looking at the Live View image on the LCD monitor, turn the focusing ring to focus manually.
5. After achieving focus, press the < > (Magnifying) button to check the image composition in normal view.
6. Check the focus and exposure, and then press the <SET> button to shoot the movie.
Notes on Movie Shooting
NOTE
Recording and Image Quality
- After you start shooting a movie, the movie shooting will stop automatically if the file size reaches 4 GB or if the movie time exceeds 29 min. 59 sec.
- For movie shooting, the ISO speed is set automatically. ISO 100 is set as standard, and then it can increase up to ISO 6400 (expandable to H1: 12800) for low-light conditions.
- The camera's built-in microphone will also record the operation noise of the Image Stabilizer, AF motor, and in-focus beeper. Also, if you operate the camera's dial or lens during movie shooting, the respective operation noise will also be recorded. If you use a commercially-available external microphone, you can prevent (or reduce) these noises from being recorded.
- Autofocusing during movie shooting is not recommended since it might momentarily throw the focus way off or change the exposure. If the AF mode has been set to [Quick mode], AF is not possible even if you press the <AF-ON> button during movie shooting.
- If [Screen settings] has been set to [Stills display] or [Exposure simulation], the start of the movie shooting might momentarily record a substantial exposure change.
Playback and Connection to TV
- If you connect the camera to a TV set with an HDMI cable and display the Live View image while shooting a movie at [1920x1080], the image displayed on the TV set will be small. However, the movie itself will be recorded in the [1920x1080] size as set.
- If you connect the camera to a TV set and display the Live View image while shooting a movie, the TV will not output the sound. (The sound will be properly recorded, but the camera will not output the sound to the TV set.)
IMPORTANT
If you use a card having a slow writing speed, the five-level indicator on the right might appear during movie shooting. It indicates how much data has not yet been written to the card (remaining capacity of the internal buffer memory). The slower the card, the faster the indicator will climb upward. If the indicator becomes full, movie shooting will stop automatically.
REFERENCE
Recording and Image Quality
- The movie will be recorded in the MOV format.
- The movie will be recorded in the Picture Style currently set.
- The movie will be recorded in the sRGB-equivalent color space optimized for movies.
- The sound is recorded in monaural by the camera's built-in microphone.
- Stereo sound recording is possible by connecting an external microphone equipped with a stereo mini plug (3.5mm dia.) to the camera's external microphone IN terminal.
- The sound recording level will be adjusted automatically
CAUTION
Notes About the Live View Image
- Under low light or bright light conditions, the Live View image might not reflect the brightness of the captured image. However, for movies, the movie image displayed will be recorded in almost the same way you see it on the LCD monitor.
- If the light source within the image changes, the screen might flicker. If this happens, stop and resume the Live View shooting under the actual light source to be used. If you point the camera in a different direction, it might throw off the Live View image's correct brightness momentarily. Wait until the brightness level stabilizes before shooting.
- If there is a very bright light source in the picture, such as the sun, the bright area might appear black on the LCD monitor. In still photos, such bright area will be recorded properly as a bright area. In movies, the bright areas will be recorded in almost the same way you see it on the LCD monitor.
- Under low light, the Live View image might show chrominance noise. In still photos, chrominance noise is not recorded. However, in movies, the bright areas will be recorded in almost the same way you see it on the LCD monitor.
- When you magnify the image, the image sharpness may look more pronounced than it really is.
Notes About the Shooting Results
- When you shoot continuously with Live View function for a long period, the camera's internal temperature may increase and it can degrade image quality. Terminate Live View shooting when not shooting images.
- Before taking a long exposure or shooting a movie, stop Live View shooting temporarily and wait several minutes before shooting. This is to prevent image degradation.
- Live View shooting in high temperatures and at high ISO speeds may cause noise or irregular colors.
- If you shoot still photos at a high ISO speed or shoot a movie in low light, horizontal stripes may become noticeable as noise.
- If you take the picture while the image is magnified, the exposure might not come out as desired. Return to the normal view before taking the picture. During the magnified view, the shutter speed and aperture will be displayed in red. Even if you take the picture during magnified view, the captured image will show the normal view.
How to Take Still Photos During Movie Shooting
During movie shooting, you can take a still photo at anytime by pressing the shutter button completely. The shutter speed and aperture are set automatically. The ISO speed is also set automatically within ISO 100 to 3200.
NOTE
- The still photo will cover the entire screen including the semi-transparent mask.
- If you take a still photo during movie shooting, the movie will record a still photo for about 1 sec. The captured still photo will be recorded to the card, and when the Live View image is displayed, the movie shooting will resume automatically. One movie file and the still photo file(s) will be recorded to the card.
whiteheadfewillic.blogspot.com
Source: https://id.canon/id/support/8200359800
0 Response to "Canon 5d Mark Ii How Long Continuous Video"
Post a Comment